Eberbach, Mark eberbach.com

Text: (727) 213-8828

IBI Eberbach

Helpful Guides to Make a Mask- New Policies and Procedures

Facial Mask Guide

Our mission at Eberbach Plastic Surgery is to provide the ultimate care in plastic surgery to our patients. Since patient and staff safety is our number one priority, we will be taking additional measures and phasing in new policies during this pandemic.

COVID Guidelines

These efforts include:

  • Spacing outpatient visits and offering the option of a virtual post-op.
  • Extensive health screenings for every patient with a temperature check upon arrival.
  • Having patients call the office upon arrival, they will individually escorted into the office by a staff member.
  • Removing high-touch items from our office such as magazines and snacks.
  • Disinfecting all surfaces between patients.

Home-Made Facial Mask Guide

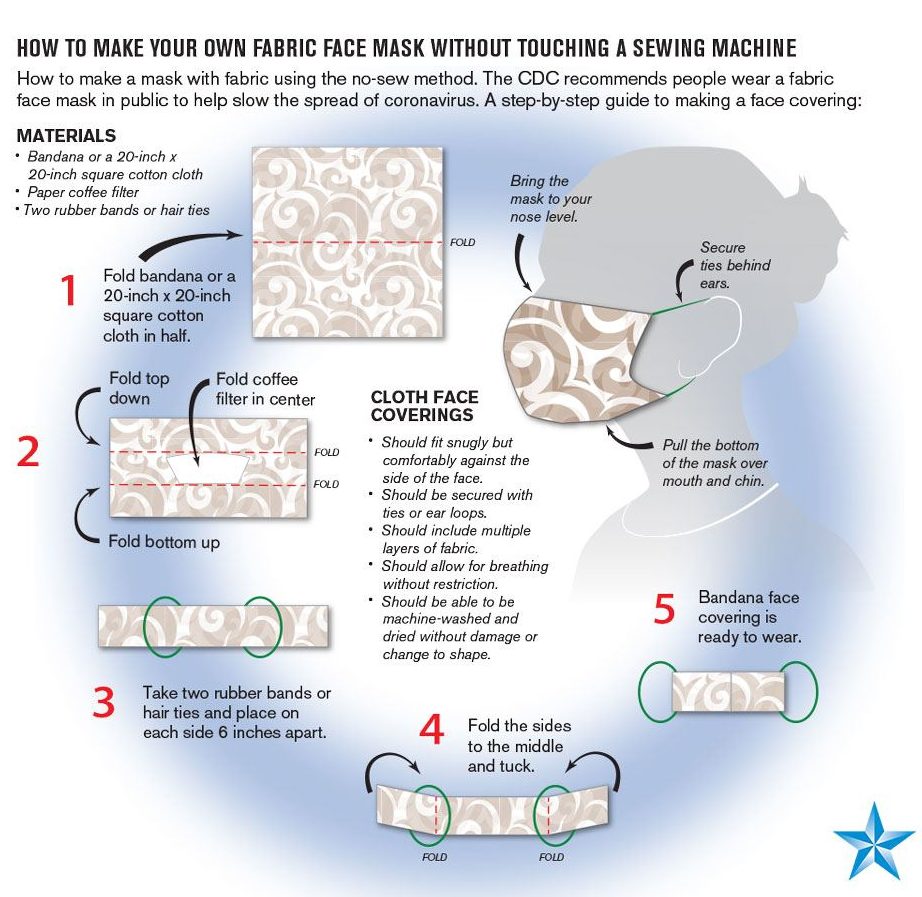
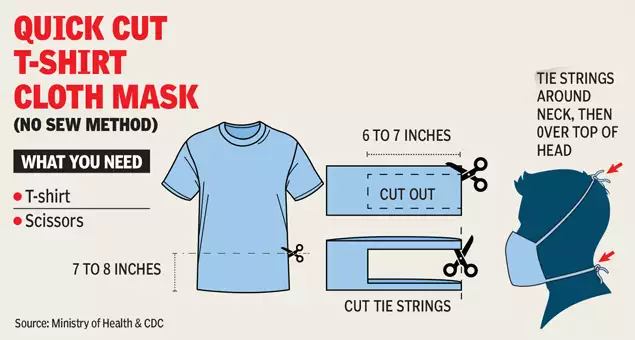
Wearing facial protection at all times is the newest policy that implemented to limit exposure. Every person in our office, including Dr. Eberbach, staff, and patients, must wear a mask at all times.  If a patient doesn’t have a mask a cloth face covering or bandana is also acceptable. Below are some helpful guides to make your mask:
 

Sewn Cloth Face Covering

Supplies needed to create a cloth face covering are displayed. The supplies pictured include: one sewing machine, one twelve-inch ruler, one pencil, two six inch pieces of elastic string, two rectangle pieces of cotton cloth, 1 sewing needle, 1 bobby pin, 1 spool of thread, and 1 pair of scissors.

Materials

  • Two 10”x6” rectangles of cotton fabric.
  • Two 6” pieces of elastic (or rubber bands, string, cloth strips, or hair ties).
  • Needle and thread (or bobby pin).
  • Scissors.
  • Sewing machine.

Tutorial

1. Cut out two 10-by-6-inch rectangles of cotton fabric. Use tightly woven cotton, such as quilting fabric or cotton sheets. Further, T-shirt fabric will work in a pinch. Then stack the two rectangles; you will sew the mask as if it were a single piece of fabric.

A close up of the two rectangular pieces of cloth needed to make a cloth face covering is shown. These pieces of cloth have been cut using a pair of scissors. Each piece of cloth measures ten inches in width and six inches in length.

2. Fold over the long sides ¼ inch and hem. Then fold the double layer of fabric over ½ inch along the short sides and stitch down.

The top diagram shows the two rectangle cloth pieces stacked on top of each other, aligning on all sides. The rectangle, lying flat, is positioned so that the two ten inch sides are the top and the bottom of the rectangle, while the two six inch sides are the left and right side of the rectangle. The top diagram shows the two long edges of the cloth rectangle are folded over and stitched into place to create a one-fourth inch hem along the entire width of the top and bottom of the rectangle. The bottom diagram shows the two short edges of the cloth rectangle are folded over and stitched into place to create a one-half inch hem along the entire length of the right and left sides of the face covering.

3. Run a 6-inch length of 1/8-inch wide elastic through the wider hem on each side of the mask. Furthermore, these will the ear loops. Then use a large needle or a bobby pin to thread it through. Later, tie the ends tight. Don’t have elastic? In addition to this, use hair ties or elastic headbands. Besides this, if you only have string, you can make the ties longer and tie the mask behind your head.

Two six inch pieces of elastic or string are threaded through the open one-half inch hems created on the left and right side of the rectangle. Then, the two ends of the elastic or string are tied together into a knot.

4. Gently pull on the elastic so that the knots are tucked inside the hem. Gather the sides of the mask on the elastic and adjust so the mask fits your face. Then securely stitch the elastic in place to keep it from slipping.

The diagram displays a completed face covering, in which the knots of the elastic strings are tucked inside the left and right hems of the mask and are no longer visible. The cloth is slightly gathered on its left and right sides, and additional stitching is added to the four corners of the gathered cloth rectangle, at the points where the cloth and the elastic or string overlap in these corners.

Be part of our community, and let’s share positivity and insights.

Recent Posts

Fillers and Botox Overview What is the difference between Fillers and Botox? While Botox and Fillers are minimally invasive injectables. However, they …

Semaglutide “The Skinny Shot” Overview We are excited to announce that Eberbach Plastic Surgery now offers Semaglutide. An FDA-approved new drug treatment …

Is there a BMI requirement to have a tummy tuck? Many patients ask us, “Is there a BMI requirement for surgery?”. The …